
Use OAOR tcode to add a new image/document entry without replacing the enjoy SAP logo
Images added via the OAOR transaction can then be used throughout SAP including within the header of your ALV grid reports.
You therefore need to be able to add your own images and one way to do this is to simply overwrite the existing enjoy SAP logo.
See the ALV grid header page if you want to see how this is done. This works quite well
but obviously can only be used to upload one image for SAP system. The problem comes when you then decided you want to upload
more images and find that the create button within OAOR doesn't do anything. It took me ages to work out how to create a new
image/document entry and upload as many images as I wanted but once you know it is quite quick to do. Just follow the simple
below steps below.
Step 1 - Execute transaction OAOR
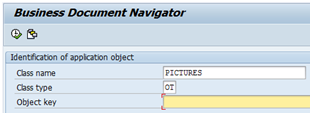
Step 2 - Enter following details
Class Name - PICTURES
Class Type - OT
Step 3 - This next step is the key, simply enter a name you want to create within the object key field (i.e. ZIMAGE1).
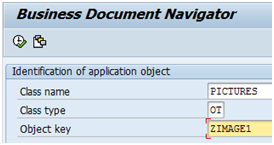
Step 3 - Now Press the execute button
Step 4 - On the next screen you are presented with the standard OAOR screen with just the pictures folder displayed.
You will notice that there is no reference to the new entry that you have just entered (i.e. ZIMAGE1). You just have to trust
that it is there and the any images uploaded will be created within it.

Step 5 - Now within the bottom left panel select the create tab, expand 'Standard Doc. Types' and double click on Screen entry.
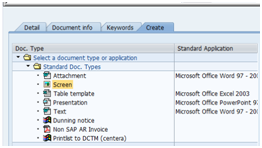
Step 6 - You will then get a standard file selection window where you can select a compatible image from your PC (i.e. .gif .bmp .png etc).
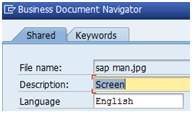
Step 7 - Enter a description and press the green tick. A message should be displayed confirming your action.
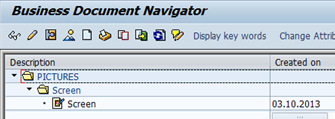
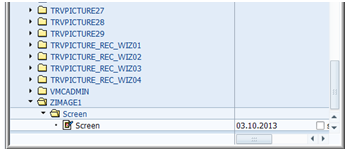
Step 8 - You should now see your image within what will look like the PICTURES folder but there is a folder called
ZIMAGE1 in-between which I will show you next. But that is essentially it and you can now use this image by referencing the
name you choose i.e. ZIMAGE1.
Step 9 - To see the images within the new folder simply return to the front screen of transaction OAOR, remove
the entry within the 'Object Key' field and press execute again.
Step 10 - You should now see the full folder list including your new one.
Step 11 - Code to add image to your ALV grid. See HERE for full code listing
CALL FUNCTION 'REUSE_ALV_COMMENTARY_WRITE'
    EXPORTING
      it_list_commentary = t_header
      I_LOGO             = 'ZIMAGE1'.
Step 12 - Further information
On a slightly related note if you wanted to create a new class (i.e. instead of PICTURES) use transaction SBDSV1. Within the transaction go into change mode (option Table View->Display/change) and create a new entry or copy an existing one. I have not tried this but think only entries within the 'PICTURES' class can be used within an ALV header.