
Add SAP Workflow event trigger
Once you have created a basic workflow it is time to add an event trigger to it. This means that when your specific event is triggered it will call your workflow.
Step 1 - Assign event receiver to a basic workflow
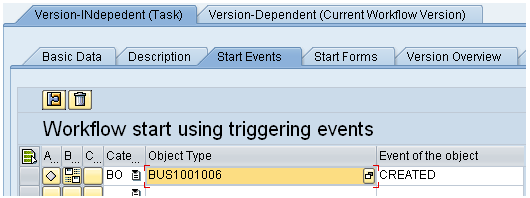
Within SWDD go to basic details (hat icon) of your workflow and select the 'Start Events' tab. Within here insert the category and type of your business object along with the event. In the example I am going to use event 'CREATED' of business object 'BUS1001006'.
Step 2 - Setup bindings
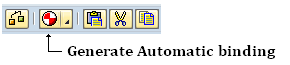
Now press the binding button

On the following screen press the Generate Automatic binding button
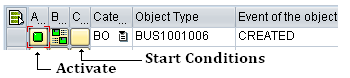
Step 3 - Activate start event
Now press the activate icon. The third button is for start conditions so you can add further restrictions on when the workflow starts.
Step 4 - Activate workflow
Now return to main workflow screen and activate it. This should be be setup and if workflow is running correctly whenever the event you have assigned you workflow too is triggered it should in turn execute your workflow.
Step 5 - Test workflow
Use transaction SWUE to simulate an event triggering to check if your wf is executed.