
BSP checkboxes using HTML and the OnInputProcessing BSP Event
If you have not created a BSP before you might want to have a look at this example of creating a simple BSP application just to get an
understanding of the basic components. The below steps will then take you though the steps required to implement a BSP web page containing multiple
checkboxes and capturing which have been checked by the user.
Step 1
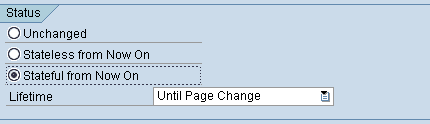
Create a basic BSP containing at least on page(with flow logic). Also ensure that it has been set to stateful within the 'Properties' tab.
Step 2 - Create data table to store your rows of data
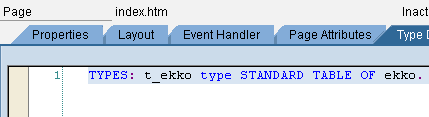
This will be used so we can display each row of data with a check box along side it. So first create a table type defining the structure of your table within the 'Type Definitions' tab.
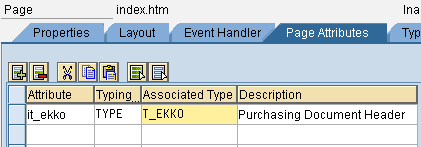
Next use this table type to create a table to store your rows of data within the 'Page Attributes' tab.
Step 3 - ABAP code to get data and display it along with checkbox
Insert the following code into the 'Layout' tab of your BSP.
<%@page language="abap"%>
<%@extension name="htmlb" prefix="htmlb"%>
<%
* Data declarations used in layout section
data: ld_datetext type string,
      ld_tabix type sy-tabix,
      ld_index type sy-index,
      ld_checkid type string,
      ld_checkname type string,
      ld_count     type i,
      ld_checkcount(3)  type n.
data wa_ekko like line of it_ekko.
%>

<html>
  <head>
    <link rel="stylesheet" href="../../sap/public/bc/bsp/styles/sapbsp.css">
    <title>SAP checkbox bsp </title>
  </head>
  <body>
    <h1>BSP to display checkbox</h1>
    <p>
    <% select *
       up to 10 rows
        from ekko
        into table it_ekko.
    %>
    <form method="post" name="form" id="form" >
    <table>
     <%
      loop at it_ekko into wa_ekko.
       ld_checkcount = ld_checkcount + 1.
       ld_count = ld_count + 1.
       CONCATENATE 'checkid' ld_checkcount into ld_checkid.
       CONCATENATE 'checkname' ld_checkcount into ld_checkname.
     %>
     <tr>
      <td>
       <%=wa_ekko-ebeln%>
      </td>
      <td>
       <input align="right" name="<%=ld_checkname%>" type="checkbox"
              id="<%=ld_checkid%>">
      </td>
     </tr>
     <% endloop. %>
     <tr><td colspan="2">
     <input name="OnInputProcessing(submit)" type="submit"
            id="submit" value="Go">
    </td></tr>
    </table>
  </body>
</html>
Step 4 - Test code as it stands
If you execute the application as it stands you should get the following result.

Step 5 - Add event handler
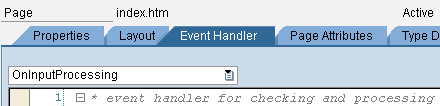
Within 'Event Handler' tab add the following code the OnInputProcessing event
* event handler for checking and processing user input and
* for defining navigation
data: gd_check type string,
      ld_checkname type string,
      ld_checkcount(3)  type n,
      ld_tabix type i,
      wa_ekko like line of it_ekko.

case event_id.
  when 'submit'.
    clear: ld_checkcount.
* If it_ekko is empty at this point, ensure BSP is set to statefull, or
* alternatively re-select data.
    LOOP AT it_ekko INTO wa_ekko.
      ld_tabix = sy-tabix.
      ld_checkcount = ld_checkcount + 1.
      CONCATENATE 'checkname' ld_checkcount into ld_checkname.
      navigation->set_parameter( name  = ld_checkname ).
      gd_check  = navigation->get_parameter( name = ld_checkname ).
      if not gd_check is INITIAL.  "=  'on' or ' '
      endif.
    endloop.
endcase.
Step 6 - Demonstrate functionality
This tutorial is really just to show the checkbox functionality without getting
into producing a full blown application. Hopefully you can then take this code an incorporate into
your application or use this as a starting point. For example instead of setting your app to
statefull and creating a table within the BSP page you could actually create a
BSP application class and store the table data in there instead etc.
But there are many options which will fit different scenarios depending on your requirements so will
let you explore these.
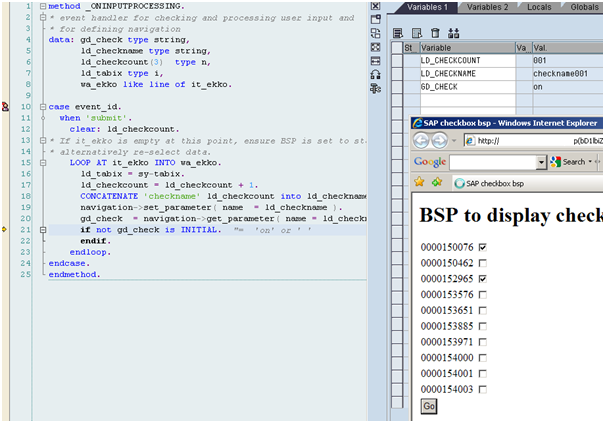
In-order to see the above code working you simply need to set a break point with the OnInputProcessing
ABAP code entered within step 5. This is done using the usual method (needs to be an external break point
if you are using a version of SAP that does not do this automatically). Once the break point has been set
execute the application and select checkboxes 1 and 3 and press the go button.

Now as you step through the ABAP code you will see that as it loops around the it_ekko table
it builds a variable (ld_checkname) containing the name of each checkbox which is used to capture its value
into gd_check. Here is what is contained on the first loop pass showing variable gd_check with a value of 'on'
indicating it is selected.
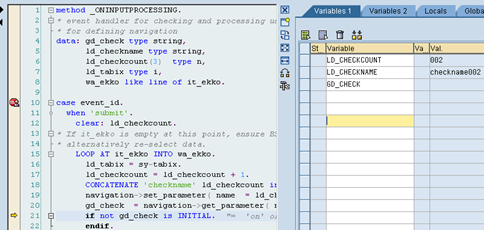
And now the second loop pass showing variable gd_check with a value of ' ' indicating the checkbox is not selected
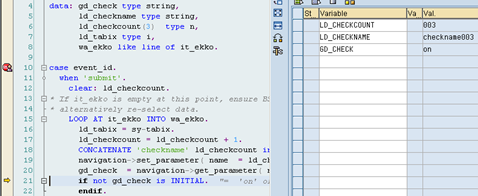
And now the third loop pass showing the checkbox is selected etc etc
See here for a much simpler way of implementing HTML Checkboxs into your BSP,
I would recommend using this alternate but is still useful to see the method above to give you ideas for future
developments which have slightly different requirements the simple list of checkboxes.