
Visual composer application with layers to allow each input/output form to be on a separate screen
Below are the steps required to add layers to your visual composer application. As these steps build on the basic SAP VC application available on this website I would recomend creating this first.
Step 1 - Add 3 transition layers to application
The first step is to add the transition layers to your application, these can be accessed via the 'Compose' button on the right hand toolbar.
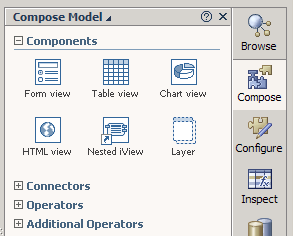
Now add 3 layers by draging them onto your iView from the right hand menu in the same way you initialy created the iView. I am going to leave the names as Layer 1, Layer 2 and Layer 3.
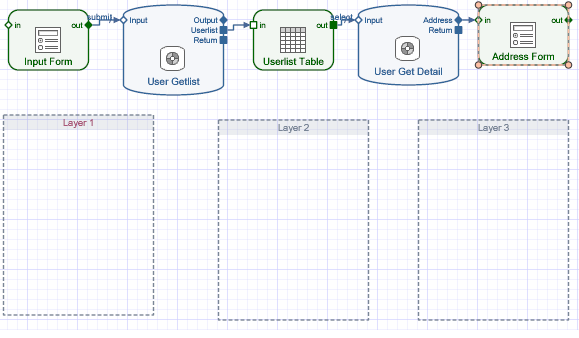
Step 2 - Move the input/output forms into the layers
Drag the three input output forms so they sit inside the three layers
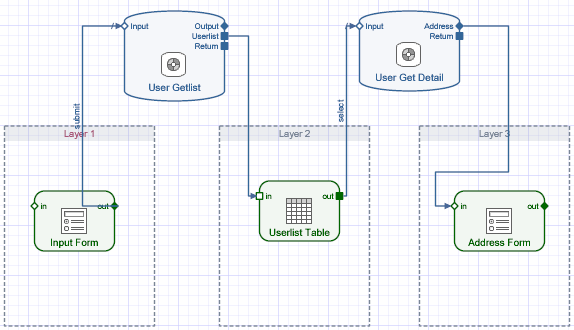
Step 3 - Configure layers
Double click on the first layer so that the 'configure Element' window appears. Set the Navigation control to 'Wizard', You may now notice that all the layers have changed there name from Layer 1 to Step 1, Layer 2 to Step 2 etc.
Set the default step to 'Step 1' or what ever you end up calling the first layer. Configuration for all the layers should now have been changed to these details, ensure this is the case by clicking on each one individually.

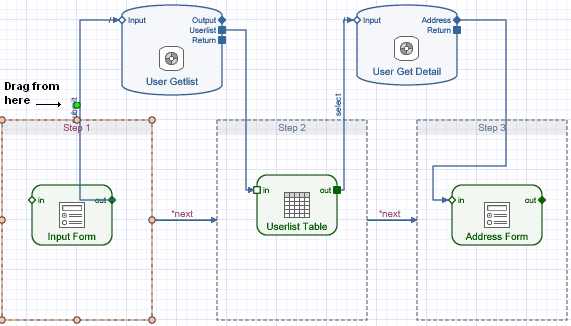
Step 4 - Link layers together
Click on the green dot hovering at the top of the first layer and drag it to the left edge of the second layer, now do the same from the second layer to the third.
Two links should have been created with the word *next on them. *next is name of the event that will be called during the transition between each view/layer. These event names now need to correspond to the event names between the
actual input/output forms and the data service (bapi). I will now take you through the process of creating some new events and updating these to the correct values!
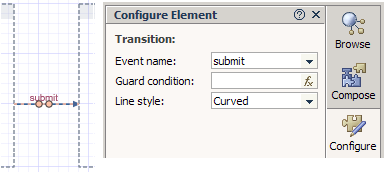
Step 5 - layer 1 to layer 2 link
As a button already exists on the first screen with the event 'submit' we can use this and set the event between the first two layers to submit. To do this simply
double click on the first link and change the event name to 'submit' from the dropdown.
Step 6 - Create toolbar on layer 2
Screen 2 currently only contains a table view so we first need to create a button to allow the user to move onto the next screen. To do this simply goto the Layout
tab and select Step 2 from the roadmap, now right click on the top area of the UserList Table and select 'Create Toolbar'.

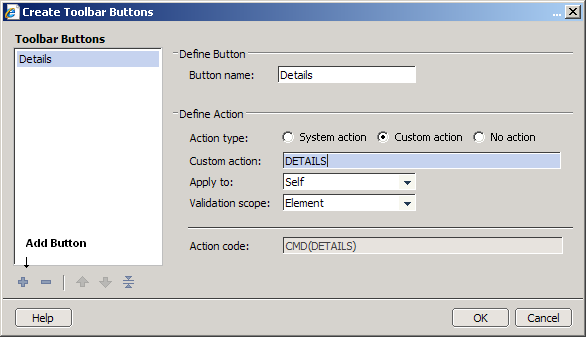
Step 7 - Add details button to layer 2 toolbar
Now add a new button to this toolbar by clicking the plus icon, give it a name of Details, select Custom action and enter 'DETAILS' as the Custom action.
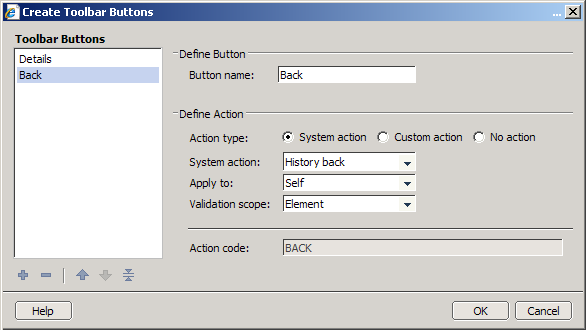
Step 8 - Add back button to layer 2 toolbar
Now add another new button to this toolbar by clicking the plus icon, give it a name of Back, select System action and select 'History back' from the System action dropdown. Now click 'OK'.
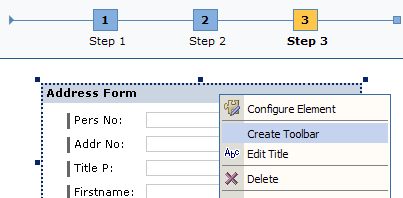
Step 9 - Add back button to layer 3 toolbar
You will also need a back button on the 3rd layer/screen, so still within the layout tab, click on Step 3 and right click on the top area of the address form and select 'Create Toolbar'
(note: you may have to scroll down to find this and feel free to move this up to the top of the area). Now create a back button in the same way you did for screen 2.
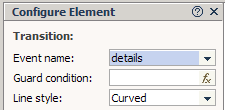
Step 10 - Update the link event name
The next step requires you to return to the Design tab and double click on the link between the 2nd and 3rd layers (*next) and change the event name to 'details' from the dropdown.
Step 11 - Update the link event name
Now do the same for the link between Userlist Table and the ..GET_DETAILS data service which currently says 'select'.

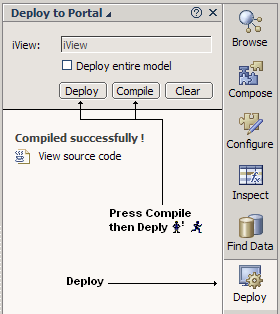
Step 12 - Compile and deploy
Within the deploy button on the right hand toolbar select compile and then deploy. Alternatively you could use the compile and deploy buttons on the top toolbar.
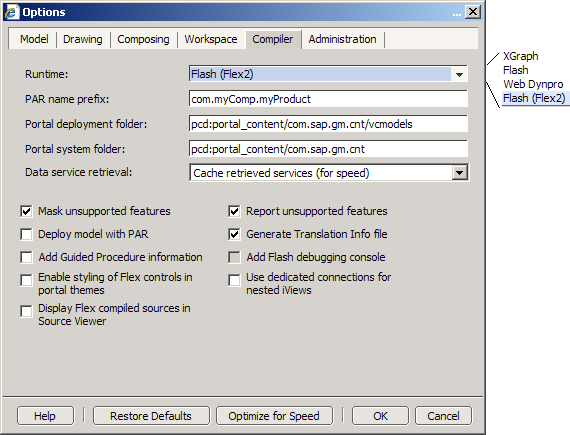
Step 13 - Change runtime compiler
You may recieve an error at this point, saying somthing about flex. This may be solved by changing the runtime compiler to 'flex2' or even 'Web Dynpro'. Make this change then complie and deploy it again.
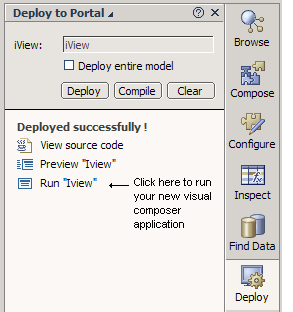
Step 14 - Run your VC application
Right thats it, now click on the Run "iView" link displayed in the deploy to portal window and your application should appear. Simples!
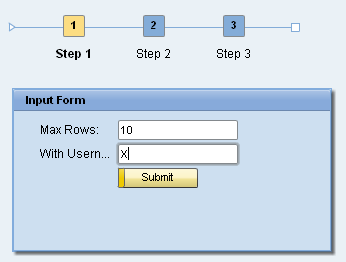
Step 15 - Running the VC application screen 1
The application is fairly straight forward, simply enter the number of users you want to return in the max row input field and 'X' in the with Username field and press Submit.
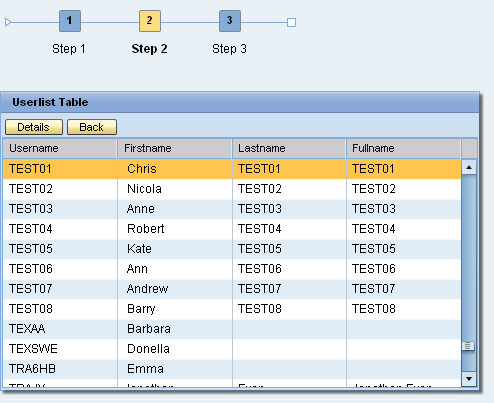
Step 16 - Running the VC application screen 2
The second screen displays a list of users, highlight one and press the details button
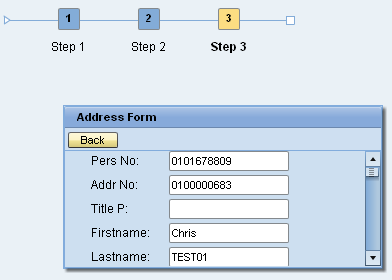
Step 17 - Running the VC application screen 3
The third screen displays further details about the selected user. Please note the position and size of the displayed elements can all be changed within the 'Layout' tab of visual composer.
 Click here to consume a web service within your VC application