
FPM easy to follow step by step guide to creating your first Floor plan manager application
My initial impression of floor plan manager was that standard FPM ABAP Web Dynpro's provided by SAP such as ESS/MSS (fite_vc*) are really good and provide a standard way of not only delivering functionality but also via the fpm enhancements an easy, semi robust and consistent way of enhancing them.
I will go into this a bit more in a separate topic.
As for creating a new Web Dynpro application from scratch using FPM, at first I was not so sure it was worth it. Nothing about creating one seemed straightforward, there didn't seem to be any massive advantage and it seemed to be a different way of doing things to standard ABAP Web Dynpro.
This is not the case and once you get you head around them they essentially provide a wrapper of standard customizable functionality which you can wrap around your existing Web Dynpro for ABAP knowledge.
If you have already had a go at these you may have found like me that some of the information available gets you to create applications and component configurations (don't worry if you don't know what these are) based on
SAP WDP components such as FPM_GAF_COMPONENT, FPM_OVP_COMPONENT or FPM_OIF_COMPONENT which then seem to disappear from your SE80 view. You may or may not have realised that that's because there is no link to your ZWDP at this
point and you are just creating the FPM wrapper for the application.
Anyway I will try and explain this in a way that made sense to me and that I would have found helpful when first learning. First just to touch on the types of FPM you have available to you which implement a set of standard behaviour associated with each type.
WDP Component FPM_OIF_COMPONENT - Object Instance Floorplan
WDP Component FPM_GAF_COMPONENT - Guided Activity Floorplan
WDP Component FPM_OVP_COMPONENT - Overview Page Floorplan
For this example I am going to create an application based on FPM_GAF_COMPONENT which basically creates an application with a number of steps along the top of the page. Something to keep in mind before we get into the nuts and bolts of this, each step can reference a window/view of different WDP applications.
Step 1 - Create standard Web Dynpro Window/View
First of all create a standard ABAP WDP application based on the hello world example here (http://www.sapdev.co.uk/webapps/webdynpro/wdp_helloworld.htm).
Now add a second view and window to the application, I have created VIEW2 and WINDOW2.

Also add a caption or some other element to this second view so it is different to the first. I have just added a caption element with 'This is the Second View' as the text value
Now embed this new view into the new window as described in the hello world tutorial.
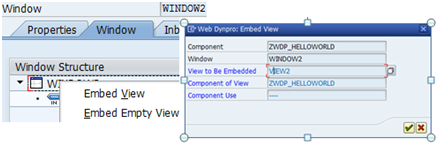
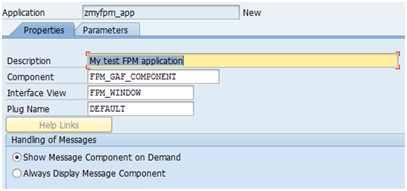
The final stage is to assign the FPM interface to this WDP component. Within the Implemented interfaces tab of the WDP component add the interface IF_FPM_UI_BUILDING_BLOCK and press enter
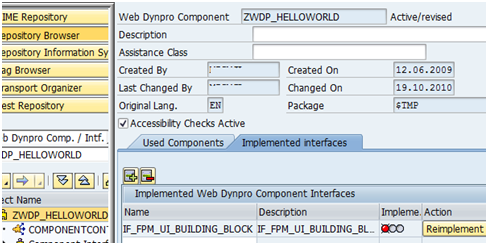
Now press the Reimplement button and the traffic light should turn green. Save and Active everything.

This now allows you to use this within a FPM Web Dynpro application but that's it for this standard web dynpro for a while, try and forget about it for now as the next few things are created independently or linked to SAP floor plan manager WDP components rather than this. The link to this comes later and hopefully this distinction will help with understanding.
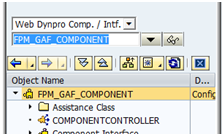
Step 2 - Create a GAF component application
Using transaction SE80 view the FPM_GAF_COMPONENT "Web Dynpro Comp. / Intf.�
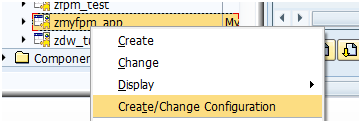
Right click on the Web Dynpro Application node and click create, also just for info you can also expand this node and see all the application created for this component, z ones will be along the bottom. You never know you may see some you have already created but wasn't sure where they had gone!
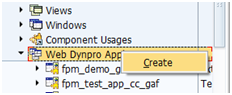
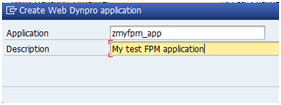
Give the new application a name such as zmyfpm_app.
Step 3 - Create a GAF application configuration
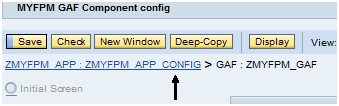
Now find the application you have just created and right click on it and select "Create/Change Configuration�
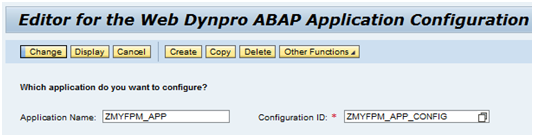
You will now be taken to the Flexible User Interface Designer (FLUID) where you will need to enter a Configuration ID such as ZMYFPM_APP_CONFIG and press the create button.
Enter transport details, description and press OK.
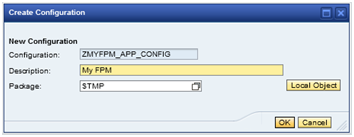
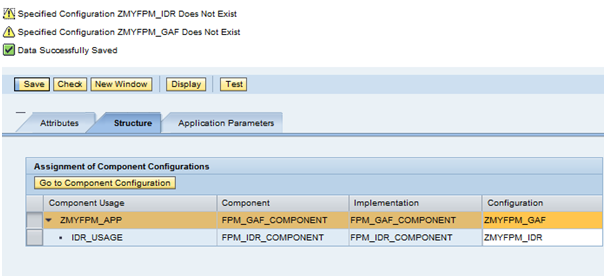
You will now see the following screen where you need to enter a name for the two blank configuration entries and press save. You should then get as save message and 2 messages saying the configurations do not exist. This is fine we will create them now.
Step 4 - Create GAF component configurations
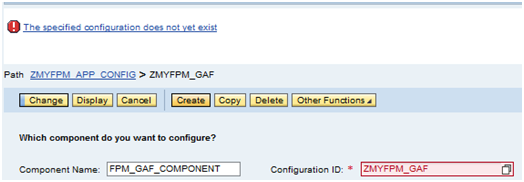
Now it's time to create the component configurations which can be done via the FLUID browser. Simply highlight the first GAF_COMPONENT row and press 'Go to Component Configuration'. You will now be presented with the following create screen with all the relevant details filled in. Press create button.
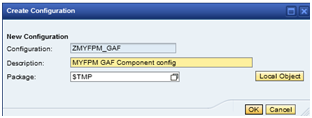
Enter transport details, description and press OK
Next click on the 'Attributes' button to populate the attributes of the default step 1 UIBB. Right this is where you reference back to your actual Web Dynpro component (i.e. ZWDP_HELLOWORLD). The component field is the WDP component name and the view is��can anyone guess?�.wrong it's the window of the WDP:-). Having said that the view is embedded into the window and the view contains all the fields etc so it does make some kind of sense. Also if you use the dropdown help button it will show you the list of windows within that WDP component.
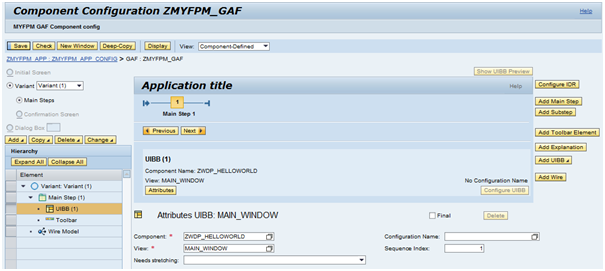
Press Save and you should get the data successfully saved message.

Step 5 - Create GAF component configurations
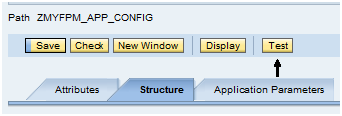
Return to the previous screen within FLUID using the breadcrumb link
Press the test button
You should then see the following screen containing the step from the FPM side of things and the Hello World text from the custom helloworld WDP.

Add Second step to GAF based floor plan manager application